Table of Contents
Understanding the Impact of Nozzle Types on Print Quality
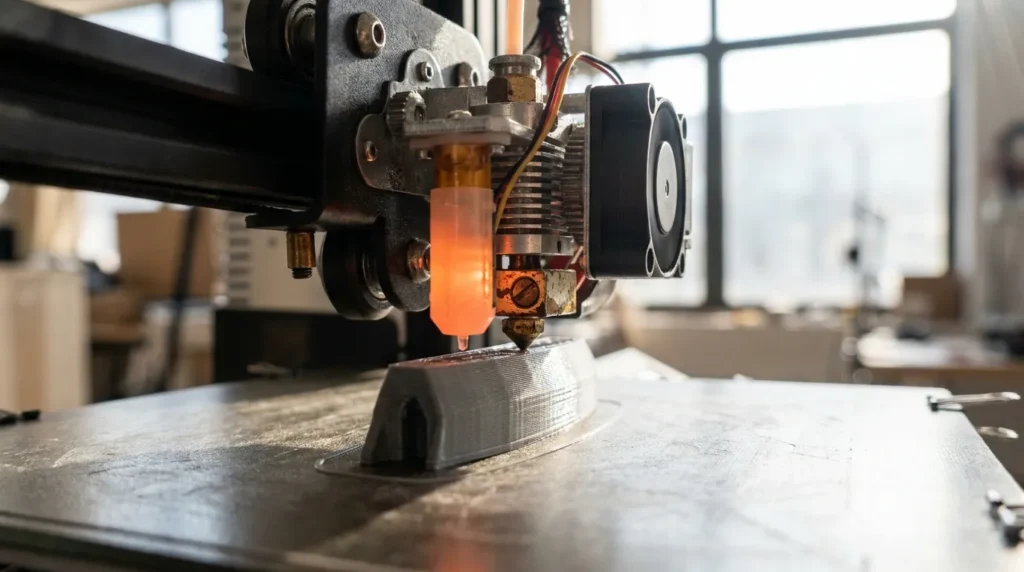
Print quality in FDM 3D printing often gets blamed on the filament or the printer itself, but a much smaller part usually plays a bigger role than people expect. The nozzle, the tiny piece at the front, directly shapes surface finish, layer bonding, print speed, and day‑to‑day reliability. For industrial engineers and experienced users, this choice can quietly decide if a print runs smoothly or fails halfway through.
In high‑speed and production setups, nozzle choice becomes part of the overall process, not just a small adjustment. A poor match shows up as rough surfaces, weak layers, or machines stuck reprinting the same part again and again. Those delays stack up quickly. A well‑matched nozzle, by contrast, allows faster print cycles, stronger parts, and steady results from one job to the next, which matters when output needs to stay consistent.
This guide explains how different 3D printing nozzles affect print quality. It looks at nozzle diameter and construction, including material options, then links those details to print speed, layer height, and the filament being used. Each factor affects the others, so changing one without thinking about the rest often leads to problems.
The focus stays on real FDM workflows used in Australian engineering and manufacturing. Expect practical setups instead of lab theory, things you can apply right away. The advice fits high‑performance systems like RatRig V‑Core platforms, IDEX setups, and Klipper‑driven printers commonly supported by Raven 3D Tech.
Why Nozzle Choice Matters More Than You Think
Every printed layer takes shape at the nozzle, where melted filament turns into a solid part. That tiny opening does more work than most people expect, and its behavior shows up right away in print quality. Research in additive manufacturing shows that layer thickness and even flow play a big role in accuracy, and both are set at the nozzle. After a few prints, this stops sounding abstract and becomes obvious in the finished parts.
Extrusion width depends on nozzle diameter. A smaller nozzle lays down thinner lines and sharper details, but it also limits how much material can pass through at once. Prints take longer, and dialing in settings takes more attention. A larger nozzle pushes more plastic with each pass, which speeds things up and helps layers stick together, even if the surface loses a bit of detail. This trade‑off is easy to predict, and trying a few sizes quickly shows which side matters more for a specific print.
The reason 0.4 mm nozzles are still so common is simple: they balance speed and detail well enough for most projects. At the same time, setups focused on production are shifting to larger diameters to improve strength and output. Different goals call for different choices, and that freedom is part of how 3D printing works.
| Nozzle Diameter | Typical Use | Key Impact on Print Quality |
|---|---|---|
| 0.2 mm | Fine detail models | High detail, slow speed |
| 0.4 mm | General purpose | Balanced detail and strength |
| 0.6 mm | Functional parts | Stronger layers, faster prints |
| 0.8 mm | Tooling and jigs | Maximum strength and speed |
Testing supports this. Switching from a 0.4 mm to a 0.6 mm nozzle can cut print time by about 28 percent on the same model. For larger parts, a 0.8 mm nozzle can push time savings past 30 percent. Strength also goes up. Tensile strength has been measured as much as 25 percent higher because layers bond better, which is easy to see on functional parts that carry real loads.
How Nozzle Diameter Affects Detail, Strength, and Speed
That single nozzle choice shows up everywhere in a print. Surface detail changes, strength shifts, and print time gets faster or slower based on the diameter. It’s a small setting, but you notice it right away once a print starts taking shape.
Small nozzles shine when detail matters. Sizes like 0.2 mm and 0.25 mm give sharper text, cleaner corners, and holes that land closer to the size you expect. This works well for logos, miniatures, and fine features. The tradeoff is material flow. Prints take longer, and layer bonding is weaker, so parts don’t handle stress as well. These nozzles make sense for display models and small, precise parts where looks matter more than strength.
The common 0.4 mm nozzle sits right in the middle for a reason. It works with most filaments with very little tuning and gives consistent results without much effort. That ease of use is why it’s stayed the default for so long. Everyday parts, fast prototypes, and items meant for light use usually print smoothly at this size.
Larger nozzles focus on strength and speed. Sizes like 0.6 mm and 0.8 mm lay down thicker layers and wider lines, which helps layers stick together better. The result is parts that feel tougher, handle impacts better, and are less fragile when you pick them up. That’s why these nozzles are common in industrial FDM printing.
Layer height is closely tied to nozzle size. Research shows layer thickness has the biggest effect on dimensional accuracy, and nozzle diameter sets the safe range. A 0.6 mm nozzle runs well around 0.3 to 0.4 mm layers, while a 0.8 mm nozzle can go higher without trouble.
Speed fits into this balance too. With dialed-in settings and the right nozzle, volumetric flow rates around 30 to 40 mm³ per second are possible. Klipper firmware helps manage these limits, keeping prints consistent even when pushing for faster results.
Nozzle Geometry and Melt Flow Stability
Print quality depends on more than diameter. The shape inside the nozzle sets the tone for how plastic behaves long before it reaches the build plate. Convergence angle, internal contours, and melt zone length all affect how evenly material moves through the nozzle, especially as speeds climb.
Research on melt flow points to a few details that make a real difference. A convergence angle around 120 degrees increases outlet velocity by roughly 2.5 percent, while a length-to-diameter ratio near 2 improves flow stability by close to 3 percent. Those numbers may look small, but during high-speed printing they cut pressure spikes and help prevent uneven extrusion. Long, straight walls are usually where these gains show up first.
High-flow nozzle designs push this further by using extended melt zones or split filament paths. Filament has more time to melt evenly, which allows higher speeds with fewer under-extrusion problems and a cleaner surface finish. The tip stays calmer, and prints fail less often.
That’s why many experienced users swap nozzles before touching the hotend. A smarter nozzle can reveal performance the printer already has, without rewiring or major upgrades.
Problems often start when speed goes up without matching nozzle geometry, or when temperature is pushed just to force flow. Stringing, rough layers, surface artifacts, and dimensional drift usually follow.
For production-grade printing, consistent flow beats raw speed. Consistency keeps results repeatable across long runs, which matters for fixtures, tooling, and batch jobs where one bad part can spoil the whole set.
Nozzle Materials and Abrasive Filaments
Print quality rarely fails all at once. It fades as material choice affects durability and how heat behaves, especially during long production runs. Small changes build up over time, and the results start to show from one print to the next.
Brass nozzles are still common because they’re easy to get and inexpensive. They move heat well and produce smooth, predictable extrusion. Problems appear with abrasive filaments like carbon fibre or glass‑filled nylon, where wear sets in fast. As the opening wears down, the nozzle’s lifespan shortens and frequent replacements become part of the routine.
Hardened steel handles abrasion far better, even with demanding use. Heat transfer is lower, so prints often need higher temperatures or slower speeds. Many industrial filaments still print well this way, and the trade‑off is manageable.
Premium options like ruby‑tipped or tungsten carbide nozzles pair strong wear resistance with good heat flow. After thousands of hours, the nozzle size stays stable, cutting down on calibration drift and helping prints stay consistent.
| Nozzle Material | Wear Resistance | Thermal Performance |
|---|---|---|
| Brass | Low | Excellent |
| Hardened steel | High | Moderate |
| Ruby-tipped | Very high | High |
| Tungsten carbide | Very high | Very high |
Across Australian manufacturing shops, abrasive filaments are common. Carbon fibre reinforced polymers are chosen for strength and heat resistance. If the nozzle doesn’t suit the material, wear speeds up and print quality slowly drops.
Matching Nozzle Types to Industrial Applications
The job should guide the nozzle choice, not the printer. Different uses stress prints in different ways, sometimes so slightly that issues show up much later. Prototypes, tooling, and end‑use parts all follow different rules. Starting with the task helps the rest line up faster.
Visual prototypes depend on detail. A 0.4 mm nozzle with fine layer heights keeps edges sharp and features easy to see, the details clients usually notice first. Functional prototypes need a different balance. Moving to a 0.6 mm nozzle adds strength while keeping most of the surface quality that still matters at this stage.
Jigs and fixtures are about toughness and speed. Larger nozzles and thicker layers cut print times and stand up better to daily use. A rougher surface is usually fine.
Multi‑material or IDEX setups demand consistency. Matching nozzle types across toolheads helps prevent flow issues and size mismatch, which saves time later.
Some engineers use one nozzle for everything, but that limits results. Swapping nozzles to fit the job often works better than fixing failed prints. For shops printing nonstop, tracking nozzle hours and replacing them early helps catch small defects before they spread.
Practical Setup Tips for High-Speed, High-Quality Results
A nozzle swap is only half the job. Calibration should come next, starting with Z offset and extrusion settings like the multiplier and pressure advance. It’s not exciting work, but skipping it shows up quickly in the print, even when everything else looks fine.
Heat settings need just as much care. Larger or hardened nozzles often need a bit more temperature to keep flow steady. A small bump of 5, 10 degrees is often enough to smooth things out, which is why skipping temperature tuning causes more issues than people expect.
For printers running Klipper, volumetric flow limits help keep higher speeds predictable. Setting a safe maximum cuts down on under-extrusion as speed ramps up, so quality stays consistent without constant tweaks.
Keep spare nozzles close and clearly labeled by size and material. Mixing worn and new nozzles often leads to uneven results.
On advanced systems supplied and supported by Raven 3D Tech, dialing in nozzle setup is one of the fastest ways to get more output without changing other hardware.
Putting It All Into Practice
Nozzle choice has a big effect on print quality on an FDM printer. It affects detail, part strength, print speed, and how reliably a setup works across repeat jobs. You notice the difference fast, even though nozzle selection often gets skipped during setup and tuning.
Small nozzles aren’t always the right upgrade. Larger options can produce stronger parts and more consistent results over time, especially when layer height and material flow are set well. Looking only at diameter misses how these pieces work together, which is a common trap during early tuning.
Industrial workflows show this clearly. The biggest gains happen when nozzle size matches the job. Geometry plays a role, and material choice does too. When these parts line up, print time drops, mechanical performance gets better, and failure rates go down. That means fewer surprises and less wasted material.
Better FDM results often start at the nozzle. Comparing sizes side by side helps. Track strength along with surface finish, and tune flow and temperature together. Over time, reliable prints come from knowing how each part shapes the final result, not from chasing one perfect setting.
