Table of Contents
Hybrid Manufacturing: 3D Printing and CNC Integration
Hybrid manufacturing isn’t some far‑off idea waiting for the future. It’s already changing how parts are designed, made, and finished, and you can see it on real shop floors right now (yes, it’s already happening). By combining 3D printing and CNC machining into one workflow, manufacturers get benefits that show up in day‑to‑day work, not just in slide decks. Additive methods often bring speed and design freedom. CNC machining adds the accuracy needed when tolerances actually matter. For industrial engineers and manufacturers in Australia, this mix feels especially relevant right now. Lead times keep shrinking. Quality expectations don’t really relax. And local production still has to compete with fast, low‑cost global supply chains (which is real pressure, honestly).
What makes hybrid manufacturing appealing is how directly it tackles these problems. You can print complex shapes fast, then machine the key surfaces down to microns without starting from scratch. That usually saves time and a fair bit of frustration. Material waste goes down. Rework often drops too. This setup works especially well for prototyping, jigs and fixtures, short‑run jobs, and one‑off custom parts that don’t suit mass production. It also fits well with high‑speed FDM systems built for reliability and dimensional accuracy. If industrial FDM printers are already on the floor, adding CNC finishing can clearly improve part performance and consistency. Less rework. More confidence, especially during busy weeks.
In this article, we look at what hybrid manufacturing really looks like on the shop floor, how 3D printing and CNC machines work together day to day, and where this setup often pays off the fastest. We’ll also share real performance data, walk through common workflows, and give practical tips you can apply step by step, without completely resetting your operation.
What Hybrid Manufacturing Really Means
Hybrid manufacturing mixes additive manufacturing with subtractive machining in one process, or at least in a tightly linked workflow. It usually starts with additive manufacturing, which builds parts layer by layer. This approach makes it much easier to create internal channels, lattice cores, and weight‑saving features that are hard to make any other way. Once the rough shape is built, CNC machining comes in to remove material where needed, hit tight tolerances, and clean up surfaces like bores, sealing faces, and mating areas. Each method has limits on its own. Together, they offer more flexibility, especially when parts have strict requirements.
So why does this matter now? Parts are becoming more complex. Internal passages, custom features, and unusual internal shapes are often hard or inefficient to machine from solid stock. 3D printing handles these shapes well, but printed parts usually still need smoother finishes or tighter dimensions. That’s where CNC machining comes in, often after printing and sometimes in the same setup, which cuts down on trial and error and leads to more consistent results.
Industry data helps explain why interest is growing. Aerospace, defence, tooling, and specialised industrial sectors are driving much of this growth, as shown in the figures below.
| Metric | Value | Year |
|---|---|---|
| Hybrid manufacturing market size | USD 3.1 billion | 2025 |
| Projected market size | USD 25.5 billion | 2035 |
| Forecast growth rate | 23.5% CAGR | 2025, 2035 |
This level of uptake shows strong confidence from established industries. While many systems focus on metal, similar hybrid setups also work with high‑speed FDM and CNC finishing. For Australian manufacturers, this often means more flexible local production without needing a huge upfront investment. More details on integrating these processes can be found in Exploring Hybrid Manufacturing: Integrating 3D Printing and CNC Systems.
Why Combine 3D Printing and CNC Machining
In real‑world shops, the appeal shows up fast: teams often move from an idea to a usable part in days instead of weeks. That happens because the workflow is split in a practical way that becomes clear once you see it running. The part is printed close to its final shape (near‑net‑shape manufacturing), and then CNC machining is used only where accuracy really matters. That usually means key surfaces, tight‑tolerance holes, mating features, and small details, not the whole part.
This setup works well because each tool is doing what it’s best at. Studies and industrial case reports often point to lower costs, shorter cycle times, and less material waste when hybrid methods are used carefully. Not every job is a good fit, but in many production settings the improvements show up again and again.
| Performance area | Typical improvement |
|---|---|
| Production cost | Up to 35% reduction |
| Cycle time for complex parts | Up to 50% faster |
| Material waste | Up to 97% reduction |
| Surface finish | Ra 30 µm to 0.4 µm after machining |
These gains come from using each process where it fits best, which is often the smartest choice. An FDM printer might build a complex jig overnight. The next day, a CNC machine cleans up reference faces and drills holes. You get a production‑ready tool in a few days, not weeks, without awkward handoffs.
This approach is especially useful for engineers who are already comfortable with design for additive methods. If that’s still new, the basics are covered in our article on design for additive manufacturing principles.
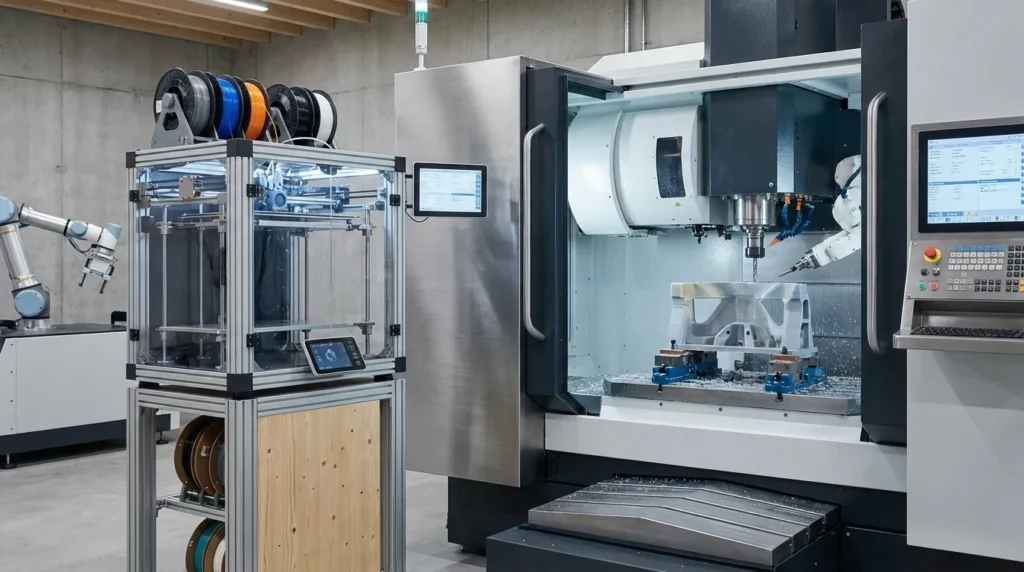
Hybrid Workflows for Industrial FDM Systems
Hybrid manufacturing doesn’t always mean a single, all‑in‑one machine (that assumption comes up a lot). In many Australian workshops, a more effective setup is often a fast FDM printer working alongside a CNC mill or router. The idea itself is simple. Where the real value usually shows up is in how each step is planned and sequenced, because workflow planning tends to do most of the work here, even though it’s often treated as an afterthought.
The process sounds straightforward, but the details are where things usually succeed or fall apart. Parts are designed with machining allowance built in from the start, leaving flat faces and tight features intentionally oversized. That choice is deliberate. Printing typically happens in stable materials like PETG or ABS, with fibre‑reinforced nylon used when stiffness actually matters, such as brackets that shouldn’t flex under load. After printing, careful fixturing allows final machining to bring critical faces, holes, or bearing surfaces into tolerance. There really aren’t many shortcuts that hold up over time.
Accuracy often depends on print quality more than anything else in this setup. That usually comes down to consistent calibration, steady thermal control, and extrusion that behaves the same way from run to run. Firmware like Klipper helps keep motion predictable at higher speeds. Dual extrusion systems, including IDEX, also cut down cleanup by handling soluble supports or mixed materials, which removes a few tedious manual steps.
We covered how multi‑material setups fit into advanced workflows here: mastering multi-material 3D printing with IDEX and Klipper and also discussed related innovations in Multi Material 3D Printing: AI and Hybrid Techniques.
The video above shows additive and subtractive steps being planned together in a clear, practical way. Even when separate machines are used, the same thinking usually applies, with more attention paid upfront so machining is saved for critical faces, bores, or datum surfaces, where the time savings become obvious very quickly.
Real Applications and Common Pitfalls
Hybrid manufacturing is already delivering real wins across several industries. In tooling, printed drill guides and fixtures are CNC‑finished to hit exact alignment points on jigs and assemblies, often within tight tolerances. In education, the payoff looks different. Students work through additive and subtractive methods in a single hands‑on project, which helps the ideas stick because they’re tied to something physical. On the production side, short‑run end‑use parts are printed and then machined close to where they’ll be used, sometimes right on the shop floor. Research labs use the same setup to move fast, iterating in days instead of waiting weeks on suppliers. This is normal, day‑to‑day work with real deadlines.
Composite tooling is a common example. An FDM printer creates most of a mold or fixture quickly and at lower cost. CNC machining then cleans up sealing faces, datum surfaces, and edges where accuracy matters. Compared to milling everything from solid stock, this often saves time and money, especially for large tools.
There are pitfalls, though. Material behavior is easy to miss, since thermoplastics can shift during machining from heat or built‑in stress. Printed parts are also less stiff, so weak fixturing can cause chatter or distortion. Toolpaths matter more than many expect, and skipped calibration lets small errors add up. That’s why printer setup usually comes first. Regular checks, bed leveling, extrusion accuracy, dimensional tests, set a solid baseline. A good reference is the article on 3D printer calibration for precision and quality, especially if the goal is a mold that seals cleanly on the first try.
Trends Shaping the Future of Hybrid Manufacturing
Hybrid manufacturing is moving fast, and day to day, it’s usually the shops closest to the work that notice it first. One clear trend is single‑setup production, where printing and machining happen in the same machine without taking the part out. This setup often cuts alignment errors that show up during final machining. These systems still come with a high price and are out of reach for many shops, but the thinking behind them is already spreading into smaller, lower‑cost machines. I think that shift matters because tight tolerances and repeatable results usually work best on the shop floor, not just in top‑end equipment.
Automation is another steady change, even if it’s not always flashy. Software now links CAD, slicing, CAM, and simulation into one workflow, which often reduces handoffs where mistakes slip in. Toolpaths are planned with both printing and machining in mind. Digital twins catch problems before a build begins. Process monitoring adds peace of mind during long or complex jobs and helps newer users get up to speed faster.
For FDM users, materials keep pushing things forward. High‑temperature filaments and fibre‑filled options move parts beyond prototypes, especially when CNC finishing is used. In many cases, performance ends up much closer to traditional engineering plastics.
In Australia, the impact stays very practical. Supply chains get shorter. Design changes happen right on the shop floor. Skilled workers spend more time solving tougher problems. And when timelines are tight, local control over lead times and quality often makes the difference.
Practical Steps to Get Started
Hybrid manufacturing usually works best when you start small. A good first step is picking one part that already causes headaches, often where surface finish or tight tolerances slow prints down. Most teams know exactly which part this is. Redesign it with machining in mind. Add clear reference faces on flat, easy-to-find surfaces so the part can be picked up later without confusion. Leave extra material where cuts will be made. It may feel wasteful at first, but it usually pays off once you see the whole process.
Before moving ahead, look closely at your equipment. A dependable industrial FDM printer with steady motion control matters more as tolerances get tighter. Upgrades like hardened nozzles, enclosed chambers, firmware tweaks, and better part cooling often help more than expected. On the CNC side, many shops do just fine with a well-set-up three-axis mill. Simple setups tend to be the most reliable.
Materials matter too, mostly in practical ways. Store filaments properly, stick to consistent brands, and label spools clearly to avoid mistakes. It also helps to test machining on scrap prints before running production parts. This small step often saves time later. Over time, internal guidelines cut down on guesswork and keep results consistent. For more on material handling and precision results, see Complete Guide to 3D Printing Filaments: Selection, Storage, and Handling for Precision Results.
If you want more background on how this all fits together, we covered that here: integrating additive and subtractive processes.
Putting Hybrid Manufacturing to Work
What usually catches people’s eye is how hybrid manufacturing delivers speed without giving up precision, which is normally the tough trade‑off. It mixes 3D printing with CNC machining, giving teams flexibility while keeping accuracy under control (often the main pain point). For Australian engineers, educators, lab managers, and advanced users, this shows up as faster prototyping, more capable tooling, and short‑run production that meets tight deadlines. Not just in theory, but in real shop‑floor work.
At its core, the idea is pretty simple. Additive and subtractive methods work better when they’re planned together. When they’re coordinated early, material waste drops, setups are quicker, and features that are usually awkward or expensive become manageable (internal channels are a good example).
Already running high‑speed FDM systems? Hybrid workflows often fit in naturally. A practical way to start is with one part, tweak feeds and tolerances as it runs, and pay attention to what actually helps. Over time, it tends to become a dependable tool, not a one‑off test.
