Table of Contents
Advanced Calibration Techniques for Precision in FDM Printing
Anyone who’s spent real time with FDM printers has seen the pattern: push speed before calibration is dialed in, and parts fall apart later. Prints can look fine at first (we’ve all been there). Then holes start to drift, surfaces warp, or a part fails inspection. That’s usually when more advanced calibration starts to matter, and it often pays off sooner than people expect.
For industrial engineers and serious users, calibration isn’t a one-time task you tick off and forget. It’s an ongoing effort that keeps accuracy tight and results consistent over long runs. Skipping it isn’t realistic. With enough care and patience, FDM accuracy can get close to what used to be limited to CNC or injection molding, but only if the process stays disciplined.
The focus here is on advanced calibration methods proven in high-speed and industrial FDM setups. It stays practical, covering the same techniques used for tooling and production parts instead of theory. Mechanical setup, motion tuning, extrusion control, and software tools like Klipper are explained in clear, usable language.
The content is aimed squarely at RatRig-class machines, IDEX systems, and upgraded industrial printers in Australia, where consistency matters more than quick demos.
Why Calibration Defines FDM Printing Accuracy
Calibration sits at the center of reliable FDM printing, even though it’s the step many people rush through. Skip it, and even high-end machines struggle to deliver the same result twice. The numbers back this up: uncalibrated FDM systems show a 41.1% print failure rate. That’s not a small swing. It clearly shows how much calibration affects day-to-day prints, not just lab tests.
When calibration is set up well, dimensional accuracy improves quickly. A well-tuned printer keeps tight tolerances across different print runs and materials, even when room temperatures shift. That kind of consistency matters when parts need to fit together properly or match standard items like bearings and fasteners. You avoid sanding edges, forcing parts together, or guessing which print might be usable.
On the shop floor, the benefits show up in practical ways. Fewer failed prints mean less filament wasted and fewer hours lost to reprints. Operators spend less time fixing problems and more time making parts that can actually be used. Over time, those small improvements add up to better throughput and healthier margins.
| Calibration Level | Typical Tolerance | Use Case |
|---|---|---|
| Basic setup | ±0.3, 0.5 mm | Visual prototypes |
| Advanced calibration | ±0.1, 0.2 mm | Functional parts |
| Industrial tuning | ±0.05, 0.15 mm | Tooling and production |
These figures come from industrial benchmarks and service bureaus that run calibrated machines every day. Calibration directly shapes part quality and scrap rates, and it builds trust in the process, you start a print expecting it to work.
Desired repeatability, reproducibility, reliability, and preciseness should be the main prerequisites of the part fabricated.
For Australian manufacturers, the pressure is even higher. Production runs are short, deadlines are tight, and rework isn’t realistic. Good calibration reduces waste and keeps lead times predictable, helping fast, on-demand manufacturing run without avoidable delays.
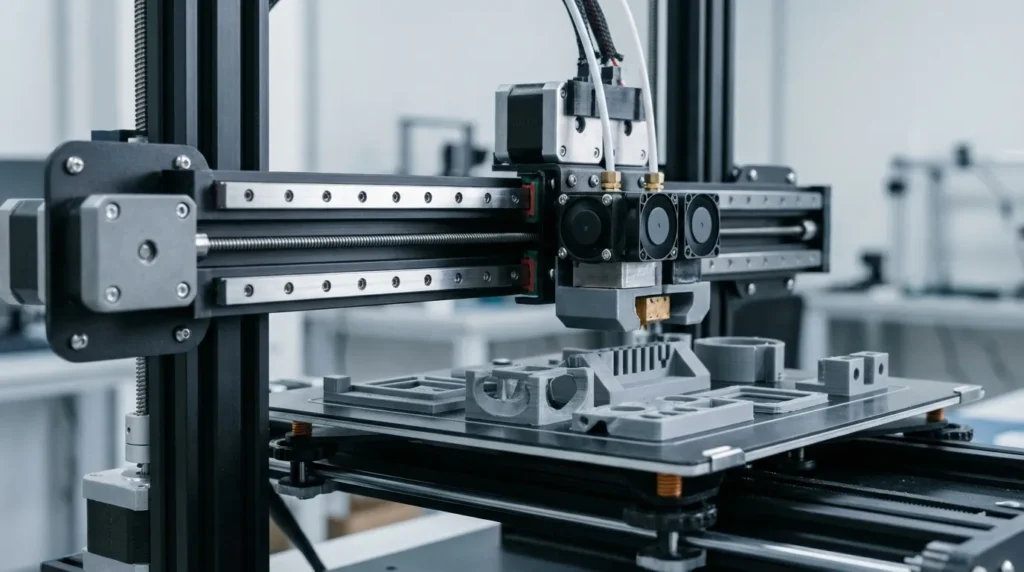
Mechanical Calibration Starts With the Frame
Most print accuracy problems show up long before you touch any slicer setting. If the frame isn’t square and stiff, software changes only hide the real issue. That’s why setting up the machine itself comes first. Skip this step and you end up tweaking numbers instead of fixing what’s actually wrong.
Frame squareness comes first. Even a small skew between X and Y, sometimes less than a degree, can turn round holes into ovals or make parts bind during assembly. A machinist square is worth using here, since printed tools can add their own errors. Check more than one spot, especially on larger frames, where twist or racking can hide until it shows up in finished prints.
Linear motion needs the same care. Rails should move smoothly from end to end, with no gritty spots or sticking. Belt tension should feel the same along the whole path. If it doesn’t, layer shifts and size drift show up as speeds go up. On core‑XY machines, closely matched belt paths matter a lot, and even small differences become obvious fast.
Z‑axis alignment often gets missed. Dual Z systems need to stay in sync, or layers compress unevenly and vertical sizes drift. Auto alignment helps, but manual checks still matter after shipping, repairs, or regular upkeep.
This is also where sturdier upgrades pay off. Thicker frames and better linear rails reduce vibration, which makes later calibration easier and keeps long prints stable instead of letting small issues pile up.
Calibration is the foundation of reliable FFF/FDM printing. If you want accurate, repeatable parts, understanding how to calibrate a 3D printer is key.
Dimensional and Extrusion Calibration That Actually Works
Getting dimensions right means the digital model and the printed part match in the real world. This matters most for jigs, fixtures, brackets, and any part that has to fit with something else. Even tiny errors add up fast. Once parts stack together, problems show up right away: gaps where there shouldn’t be, fits that are too tight, and assemblies that fight you the whole time.
The basic workflow is pretty simple. A small test cube does the job. Measure it carefully with calipers you trust, then compare the target size to what the printer actually made. From there, steps per millimetre are adjusted using a simple calculation:
New steps/mm = (Expected dimension ÷ Measured dimension) × Current steps/mm
Each axis needs its own check. X, Y, Z, and the extruder almost never match exactly. Belts stretch a little, pulleys differ, and small mechanical quirks pile up. Slightly different values are normal, even if they look messy at first.
Extruder calibration needs extra care because extrusion errors cause more size issues than most other settings put together. The usual method works for a reason. Mark 120 mm of filament, command a 100 mm extrusion, then measure what’s left. Adjust E-steps until the numbers match. Everything is measured, with no guessing.
After E-steps are set, adjust flow rate in the slicer. This covers nozzle differences, filament brands, and temperature choices. If flow is off, you’ll see it fast as oversized parts, weak walls, rough surfaces, or poor layer bonding.
Two mistakes show up a lot: changing several settings at once and calibrating with wet filament. Dry the filament first. Moisture ruins repeatability and adds random variation that calibration can’t fix, so removing that variable early saves a lot of frustration.
High-Speed Calibration With Input Shaping and Pressure Advance
High-speed FDM printing pushes hardware harder than ever. Accelerations over 5,000 mm/s² are common now, and that’s where older calibration habits start to break down. Problems show up quickly, especially as print speeds rise.
Input shaping looks at vibration control at these higher limits. The printer measures its own resonances, then the firmware adjusts motion to cancel them out. The real-world result is cleaner edges and much less ringing, without giving up speed. On larger machines, visible surface defects can drop by more than 50%, which is easy to see even on everyday prints.
Pressure advance handles extrusion during fast speed changes. By adjusting flow in real time, it keeps corners sharp and holes round as motion speeds up or slows down. That steady behavior matters for tight tolerances and even wall thickness across the whole print.
These features are built into firmware like Klipper, and for high-speed printing they’re a requirement, not a nice extra. Accuracy relies on them.
Pressure advance isn’t one-size-fits-all. Each filament acts differently, from PLA to filled materials. Swapping nozzles or temperatures means calibrating again. It’s extra effort, but the print quality makes it worth it.
Advanced Systems: IDEX and Multi-Material Calibration
IDEX printers raise the bar. Two independent toolheads mean more calibration work, there’s no way around that, but they also open up print options a single nozzle can’t handle, which is why people choose them.
Each toolhead acts like its own printer. Steps, flow rate, pressure advance, and temperature tuning all need to be set separately for each extruder. Skip one step and problems usually show up later, often right in the middle of a print that actually matters.
After that, alignment takes center stage. X and Y offsets need to be set so both nozzles land on the same spot. Even a 0.1 mm mismatch can show up in dual‑material prints or where supports touch the model, even if everything else looks fine.
Material behavior adds another layer. Plastics shrink in different ways as they cool, so calibration should always use the exact filaments planned for real prints. Test spools often lead you in the wrong direction.
When it’s done right, the results are easy to see: cleaner support removal, better alignment, and fewer surprises.
For Australian users running advanced setups, integrated solutions can help. Providers like https://raven3dtech.com.au/ focus on systems built for this level of calibration, instead of treating it as an extra.
Putting Precision Into Daily Practice
Precision holds up best when calibration becomes a habit. Industrial teams usually treat it like machine servicing, not a one‑time setup or a box to tick and forget.
A clear schedule helps once everything is up and running. Mechanics often get a monthly check, while extrusion is checked quarterly. Input shaping needs another look after hardware changes or any time the printer is moved. You’ll notice that consistency depends less on fancy tools and more on sticking to the plan, even when work piles up.
Good documentation makes that routine easier to keep. Saving profiles for each filament and nozzle pair can shave hours off setup time and cut down on mistakes when deadlines are tight and pressure is high. That’s usually when small misses turn into real problems.
Regular measurement matters just as much. Calipers or micrometers make it easier to catch drift early and track changes over time. Small fixes now help avoid bigger failures later and keep production schedules steady, without surprise setbacks.
Well‑tuned calibration pushes FDM past basic printing. It’s how accuracy reaches levels that work for tooling, fixtures, and low‑volume runs. If faster prints are the goal, this is where to focus. Start simple, then dig deeper where it matters.
