Table of Contents
Optimizing Your FDM 3D Printer Setup: A Step-by-Step Guide
Getting great results from FDM 3D printers isn’t about luck. It usually comes down to a smart, repeatable 3D printer setup that balances speed and accuracy. Good uptime often depends on getting the basics right, the unglamorous stuff, honestly. Simple things. For engineers and manufacturers, even small setup mistakes can quickly turn into wasted material, lost time, or parts that fail during real production runs or while in use. And yeah, that hurts. This guide lays out a proven, step-by-step way to optimise an FDM 3D printer setup for industrial and professional use. It keeps things clear and practical, with no fluff.
What matters most in real production environments is usually pretty consistent. Mechanical stability. Motion tuning. Extrusion control, including how filament is driven. Thermal consistency. Firmware setup. The essentials, the things that often need checking more than once. These areas are what separate hobby-level printing from production-grade output, especially when reliability matters during long, unattended print jobs. Whether it’s a RatRig V-Core system or a custom Klipper-based machine built in-house, the core ideas stay the same, with little room for guesswork.
This article is written for Australian engineers and educators, along with advanced users who rely on fast, dependable printing for jigs, fixtures, tooling, and functional prototypes. Real work, not display pieces. Each step is broken down using simple language and clear actions that can be applied across different machines and workflows, which usually makes life easier.
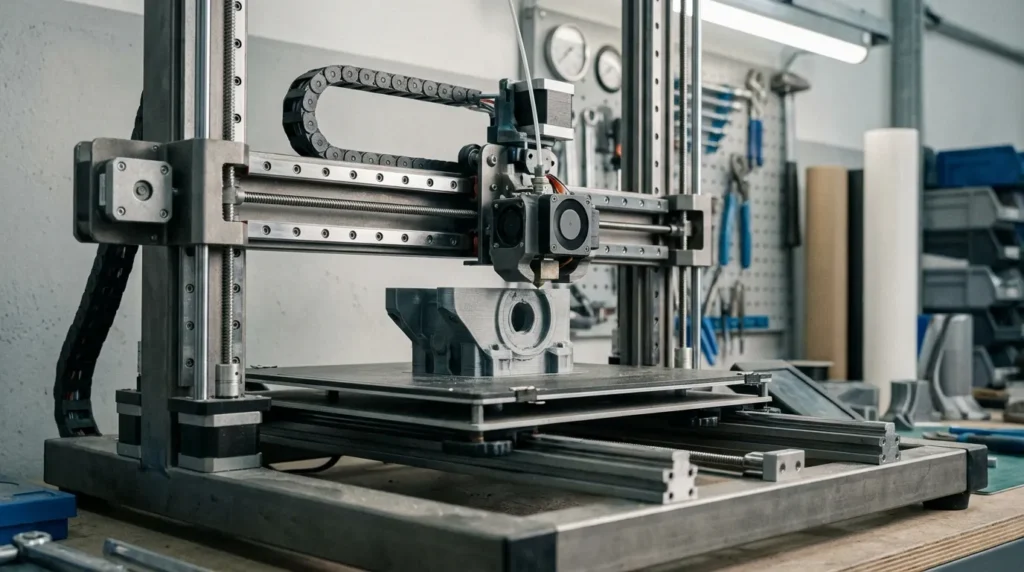
Start With a Solid Mechanical Foundation for Your 3D Printer Setup
High-performance 3D printer setups usually succeed or fail based on the frame and motion system. When a machine isn’t square or stiff enough, and motion doesn’t feel smooth across the full range, slicer tweaks rarely fix the problem. That’s just how it often goes, frustrating as it can be. Industrial FDM 3D printers depend on mechanical accuracy to hold tight tolerances at speed. There’s nothing fancy here, just basic physics showing up exactly when it should.
A good place to start is frame squareness. Measure diagonals carefully, then loosen and re-tighten fasteners in a steady, repeatable order so the frame can settle on its own. Taking your time usually works better than rushing. Linear rails or rods should move freely, without binding or rough spots. If belt tension isn’t even, parts often come out skewed, and surface ringing tends to show up fast, most people notice it right away.
It’s also worth checking fastener quality and mounting points. Loose T-nuts, corner brackets that flex under load, printed mounts made from softer plastics, and worn washers can all allow movement during acceleration. These sound like small issues. On high-speed machines, though, even slight flex often turns into layer shifts or drifting dimensions. Replacing weak parts with metal brackets or adding gussets at frame joints can clearly improve rigidity.
Research consistently shows that mechanical setup sets the limit for most achievable accuracy. Entry-level machines often land around ±0.3 to 0.5 mm, while well-tuned industrial-style systems reach much tighter results. That difference matters in real use.
| Printer Class | Typical Accuracy |
|---|---|
| Entry-level FDM | ±0.3, 0.5 mm |
| Tuned mid-range FDM | ±0.1, 0.2 mm |
| Industrial linear-rail FDM | ±0.05, 0.15 mm |
On high-speed systems, rail alignment matters even more. Misaligned rails increase friction and quietly cap acceleration, so spending extra time here is usually worth it.
Dial In Motion and Firmware for Speed Control in Your 3D Printer Setup
Once the mechanics are in good shape, focus usually moves to motion tuning. This is where modern firmware like Klipper really starts to make a difference on FDM printers, and where things often begin to click. High-speed printing isn’t about cranking up feed rates and hoping for the best. That approach rarely works. The real goal is controlling motion forces so the machine stays stable as speeds rise, instead of shaking itself into trouble. This is the point where speed feels less risky and more repeatable.
The biggest gains usually come from settings like acceleration, jerk or junction deviation, and input shaping. These control how the printer moves and help cut down vibration and ghosting, the ripples most people notice first. With Klipper, input shaping is tuned using simple test prints and accelerometer data from the printer itself. The results are often obvious right away: corners get sharper, surfaces look cleaner, and those gains often remain even as speeds go up.
Acceleration is best increased slowly, one step at a time. There’s no need to rush, since problems often show up first as hot motors or rough surface finish. Many industrial-style machines run around 8,000 to 15,000 mm/s² when tuned well, but firmware limits should match what the hardware can really handle, not what a spec sheet claims.
Pressure advance is just as important. It controls how extrusion pressure responds to speed changes. When it’s off, fast prints tend to show blobs or thin corners. When it’s tuned, extrusion stays consistent and fixing issues is usually much easier.
In real production settings, these tweaks make speeds above 300 mm/s realistic without giving up accuracy. That usually means faster iteration, fewer failed parts, and better use of the machine, especially in busy shops and labs where time truly matters.
Calibrate Extrusion for Strength and Accuracy
Extrusion calibration is one of those steps that quietly causes problems, often more than people expect, because it’s easy to miss. Small errors here usually affect strength, surface finish, and part size at the same time. It doesn’t demand attention, but it often explains those frustrating “mystery” print issues. This process should start with E-steps calibration, while slicer tweaks usually come later.
So what’s the clearest check? You ask the printer to extrude a fixed length, often 100 mm, and then measure what actually comes out of the nozzle. Accuracy really matters here; guessing by eye rarely works. Once the commanded and measured lengths match, flow rate tuning can follow to gently improve the result.
Extrusion problems tend to show up in clear ways. Over-extrusion often appears as thick walls and softened details that blur edges and corners. Under-extrusion usually shows up as gaps and weak layer bonding, which can make parts fragile. For production parts, either issue can become expensive fast.
Wall thickness tests and single-wall cubes are especially useful when checking real-world accuracy. They show how slicer settings meet nozzle size, filament tolerance, and actual melt behavior, measured results, not theory.
Material changes matter too. Each filament type, and often each spool, behaves a bit differently, which is annoying but normal. Industrial users often document flow rates for PLA, PETG, ABS, and fibre-filled nylons so adjustments stay quick and repeatable.
| Calibration Step | Purpose | Frequency |
|---|---|---|
| E-steps | Correct extrusion length | Once per machine |
| Flow rate | Material accuracy | Each filament |
| Retraction tuning | Reduce stringing | Per material |
Control Thermal Stability for Long Runs
Thermal management is easy to miss, especially when the first layers look good, but it often decides how a long print ends up. Small temperature changes affect how layers stick together, overall part size, and surface quality. Over many hours, these small shifts add up more than most people expect. On industrial FDM 3D printers, keeping temperatures steady isn’t just a bonus, it’s what stops slow, gradual quality loss during long jobs.
A smart place to start is the hotend. This is where you’ll usually see the clearest improvements because it controls how evenly material is pushed out. A dependable heater and thermistor with good thermal contact help keep extrusion stable. On high‑flow setups, higher‑wattage heaters are often needed so temperatures don’t dip when speeds rise and long toolpaths start stacking up. That’s often when issues begin to appear.
Bed stability matters just as much. Uneven heat or slow temperature drift can cause warping or first‑layer problems, sometimes hours into a print. Running into that late in a job can be frustrating. Adding insulation under the build plate helps keep heat even and reduces wasted energy.
The build chamber also plays a role. Even partial enclosures usually reduce warping and layer stress, especially with ABS and nylon. A stable chamber temperature makes results more consistent and reduces guesswork.
Cooling needs balance. Too much airflow can weaken layer bonding over time, while weak or poorly aimed cooling causes sagging and rough overhangs at higher speeds. For fast printing, focused, high‑pressure cooling usually works better than large fans.
Advanced Setup for Dual Extrusion and IDEX Systems
Dual extrusion adds flexibility, but it usually means more planning and, yes, more steps. IDEX systems work well for multi‑material parts and soluble supports, especially when small details need tight tolerances. They’re often chosen when close control over tool movement matters, though they really only pay off when the setup is done carefully. If it’s not, print consistency tends to drop.
Before anything else, each toolhead needs correct mechanical alignment. There aren’t real shortcuts here. X offsets have to be exact, and matching Z heights is especially important, since even small errors can cause nozzle crashes or a weak first layer that’s obvious right away. Each side also needs its own extrusion calibration, because shared settings rarely behave the same.
Synchronisation between toolheads usually needs ongoing checks rather than a one‑time adjustment. Differences in cooling or nozzle wear often show up as visible seams between materials. Running comparison prints from time to time helps spot drift early, before it affects real parts.
Tool change routines should be tested under real printing conditions. Purge volumes and wipe positions both affect surface finish. Once dialled in, IDEX systems can double output or handle complex parts without manual work.
| IDEX Feature | Benefit | Setup Focus |
|---|---|---|
| Independent carriages | Parallel printing | Axis alignment |
| Dual materials | Complex parts | Extrusion tuning |
| Soluble supports | Better surfaces | Thermal control |
For Australian manufacturers, this type of setup often supports short‑run production and rapid tooling with minimal labour, especially when repeatable results are required.
Put Your 3D Printer Setup to Work
Optimising a 3D printer setup is rarely a one‑off job. It’s an ongoing loop you can repeat, track, and adjust as your needs grow over time, and they usually do. In practice, things tend to go best when you start with mechanics and motion: belts, rails, and alignment. When those basics are solid, extrusion becomes easier to dial in. After that, you can lock down thermal stability before adding advanced features. It’s tempting to skip ahead, but following this order often avoids headaches later.
Clear operating procedures for calibration and maintenance help keep performance steady. When these steps are simple and repeatable, regular checks can prevent slow quality drops and make fixes quicker. This matters even more in shared shops or schools, where different people tweak printers from week to week.
For industrial users, this approach can cut downtime and wasted material, which saves money. It can also help teams rely on FDM printers for end‑use parts, not just prototypes.
Running several printers? Try standardising setups, logging settings, and making calibration part of daily production. With good setup habits, fast and accurate FDM printing can deliver consistent results, and sometimes turn a routine job into a profitable one.
