Table of Contents
Mastering 3D Printer Calibration: Essential Techniques for Precision
Getting clean, accurate parts from a fast FDM printer usually isn’t about luck. It comes from careful 3D printer calibration and steady attention to setup, even on busy days when it’s tempting to skip a step. For industrial engineers, educators, and advanced users, calibration often marks the difference between a decent machine and a production tool you can trust day after day. At higher speeds, especially past 150 mm/s, small problems can pile up fast. A loose belt, an incorrect flow rate, or the wrong layer height can quietly ruin a full batch before anyone notices, which is frustrating in real work settings.
What makes this guide interesting is its focus on repeatability, tight tolerances, and results that hold up outside of test prints. Real results. It looks closely at practical calibration methods that usually pay off on high-speed, high-precision FDM systems used for prototyping, tooling, and short-run production, where small mistakes get expensive quickly. The guidance fits industrial-grade machines like CoreXY and IDEX platforms, along with printers running modern firmware such as Klipper that often respond well to hands-on tuning. No fluff.
You’ll find how accuracy is measured, which calibration steps usually matter most, and how to avoid common time- and material-wasting mistakes. There’s also a look at how newer auto-calibration trends are changing daily workflows in subtle ways. Skilled setup still determines consistency and reliability in most cases, even now.
Understanding Accuracy and Tolerances in FDM Printing
Before changing any settings, it usually helps to be clear about what “good” accuracy actually means, because it’s rarely just one number. In short, context often decides what’s acceptable. FDM printing isn’t machining, and every system hits physical limits at some point, even when it’s used carefully. That said, modern printers can give consistent results when they’re set up properly and maintained with care. Dimensional accuracy refers to how closely a printed part matches the original CAD model. Precision, which is often harder to reach, is about getting the same result again and again across multiple prints over time.
For industrial users, tolerances matter because parts need to fit together and handle loads without surprises, so guessing usually isn’t acceptable. Research from service bureaus and manufacturers shows fairly similar performance ranges across printer classes, but those ranges overlap more than many buyers expect, which can surprise people.
| Printer Class | Typical Tolerance | Use Case |
|---|---|---|
| Entry-level FDM | ±0.3, 0.5 mm | Basic prototypes |
| Tuned mid-range FDM | ±0.1, 0.2 mm | Functional prototypes |
| Linear-rail industrial FDM | ±0.05, 0.15 mm | Tooling and fixtures |
As the table suggests, calibration and mechanical quality often matter more than price alone, a detail that’s easy to miss. A well-built CoreXY or IDEX printer with linear rails can outperform a more expensive machine that isn’t tuned. Specialists also point out that some error is normal. ±0.1 mm is often seen as fine for functional parts, with better results possible through careful, regular tuning.
For most printers, an error of ±0.1 mm is acceptable, but with tuning, even better is possible.
Layer Height and Its Impact on Dimensional Accuracy
Among all the tuning options, layer height usually matters the most. Many users focus on speed or infill early on, but research often points back to layer height as the setting that most consistently affects accuracy. Thinner layers tend to improve Z-axis resolution and cut down step error, which can add up faster than expected. Because of this, corners often come out sharper, and angled surfaces usually feel smoother instead of uneven. It’s one of those changes that most people notice right away once they try it.
Peer-reviewed studies back this up. Materials researchers have shown that changing layer height causes the biggest shifts in width and height error across printed parts. This effect becomes even clearer at higher print speeds, where vibration and motion issues can stack up. Small tweaks here often lead to surprisingly large differences in the final print.
Layer height was the most significant factor impacting dimensional accuracy. Adjusting layer height caused the largest and most consistent shifts in both width and height errors.
Still, the smallest possible layer height is not always the best option. In industrial settings, print time and accuracy usually need to be balanced. A common rule of thumb keeps layer height between 25% and 75% of the nozzle diameter. For a 0.4 mm nozzle, settings around 0.2 to 0.28 mm often land in a steady, predictable middle ground without making prints take too long.
On high-speed machines, slightly thicker layers can actually help when cooling and flow are well tuned. This can limit heat buildup and sometimes improve dimensional stability. After switching nozzle sizes or materials, it’s smart to re-check calibration and then dial in the target speed, it’s usually time well spent.
Extrusion, Flow Rate, and Material Control
Once layer height is set, extrusion accuracy is usually where issues start to show. If flow is too high, parts print oversized, most clearly around holes and outer walls. If it’s too low, walls get weak and gaps form along seams, the rough lines most people spot right away. Both problems hurt dimensional accuracy in clear, easy‑to‑see ways, so it’s usually obvious what’s happening. Flow rate calibration, often called E‑step tuning, helps the printer push the right amount of filament instead of guessing. You’ll often see the difference on the very first test print.
A solid method is to measure filament diameter at several spots along the spool, not just once. Real filament varies more than the label suggests. Even a 0.05 mm change can matter more than you’d expect. Take your time with the next step. Print a single‑wall test part, measure the wall with calipers, and adjust flow until it matches the slicer’s target. Make small changes, or you’ll overshoot.
Material choice matters too. PLA is forgiving and stable, which makes it a common pick for tuning. PETG and ABS usually behave better when temperatures are well controlled. Nylon and filled filaments often need slower speeds and more patience, there’s rarely a shortcut. Infill density also affects accuracy, since internal stress can change length and width.
Infill density [is] the most critical factor affecting length and width deviations in FDM-printed PLA parts, with layer height playing a significant role in angle and height deviations.
For tooling and fixtures, very low infill is best avoided. Use consistent wall counts and repeatable infill patterns. It’s not exciting, but in my view, this is where industrial‑style calibration often beats quick hobby fixes.
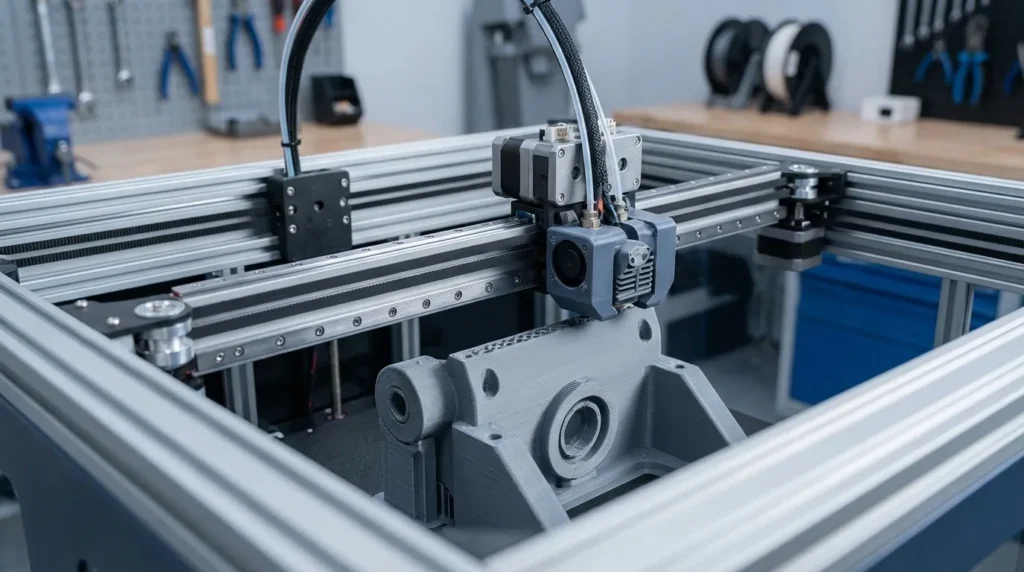
Mechanical Calibration for High-Speed Systems
Once speeds go past about 200 mm/s, the mechanical setup often becomes the bottleneck. Firmware tweaks sound tempting, but they rarely fix loose belts or misaligned rails (sadly). That’s why frame squareness needs attention early. When a frame isn’t square, prints drift and skew, and slicer tweaks almost never save them, not ever, in my view.
Next up is belt tension, and balance really matters. Loose belts often cause ringing and dimensional errors that get worse at higher speeds. Too much tension can overload bearings and motors, which may shorten their lifespan. Linear rails should slide smoothly from one end to the other. Any binding, even slight resistance, can turn into layer shifts once acceleration increases.
The Z-axis also matters a lot, especially on long prints. Lead screw alignment and bed mounting both affect layer consistency. Research suggests modest Z speed increases can reduce error by limiting heat buildup, but that usually helps only when the mechanics are already solid.
IDEX systems add more complexity. Both toolheads need to line up across all axes, and small errors add up fast. Poor calibration leads to mismatched parts and wasted material, so it’s better to align nozzles mechanically before relying on software offsets.
Firmware, Automation, and the Future of Calibration
Modern firmware has changed how calibration works, and you can see the difference quickly on the printer. Systems like Klipper use tools such as input shaping and pressure advance, along with real-time correction and compensation, to reduce errors during printing, which you’ll usually notice right away. Because of this, auto bed leveling and vibration tuning often save setup time and help results stay consistent from one print to the next. As these tools keep getting better, fewer people look for manual calibration, mainly because the software now handles more of the repeatable work. It’s a noticeable shift.
That said, automation works best when it’s backed by real understanding, and this part is often missed. Auto-calibration needs a solid starting point, not guesswork. Loose belts or wrong flow settings can be hidden by software and cause problems later. Skilled operators use automation to speed up processes they already trust, while still watching the basics. There are no real shortcuts.
For Australian industry and education, this matters in practice. Teaching students and technicians how calibration actually works builds long-term skills, not just faster setups. High-speed FDM has moved beyond simple prototyping into real production use, marking a clear change.
Putting Precision Into Practice
Calibration works best when it stays focused instead of dragging on, and that’s usually the part people appreciate. What matters most is knowing which techniques actually help and using them in a smart order. The real payoff comes later: steady output, even from fast machines that still need to stay consistent over long runs. That kind of reliability often shows up earlier than you’d expect.
So how do you get there? A solid way to start is with the mechanics, then pay close attention to layer height. From there, tuning extrusion and how the material behaves tends to fix most problems. Firmware tools usually come last, helping smooth motion or clean up small artifacts instead of covering up deeper issues. In most cases, there’s not much guesswork.
For industrial engineers and advanced users, this order often leads to predictable parts, less wasted material, and faster iteration. That’s where calibration shows its value. Write down your settings and check them again after upgrades or material changes, since new nozzles or filaments can change results. To me, calibration is regular upkeep, especially when a jig needs to fit right or handle load.
